As mentioned a few days back I have moved from WordPress to reside at Squarespace.
The new link is Http://www.lensintheface.com
Hope to see you there.
LITF
As mentioned a few days back I have moved from WordPress to reside at Squarespace.
The new link is Http://www.lensintheface.com
Hope to see you there.
LITF
 While idly flicking through my photos, looking for inspiration, I came across an older photo I took which had me leaning out of my kitchen window. It was of the sun setting in the west after a long day of spewing photons at the Earth.
Now I don’t normally practice the art of Pareidolia but this time I did think the cloud in the foreground resembled a screaming face. I took the shot and filed it away in Lightroom under Weather\Clouds.
I did not use a star filter for this, I simply set my aperture to f22 and took the shot, the sun should spike like that every time. There was enough light coming in to achieve 1/50th of a second at 100 iso.
This was mono-chromed with a light blue tint and more sun rays were added but  I thought that the sky lacked detail in a big way so I hunted down a few more photos that I thought would fit the bill.
This one did! Lots of detail in the sky and was a sunrise from the east.
I thought these two could easily mash together and produce a better picture combined. The aspect ratio was way off on the second photo so I decided to keep the originals, this would allow me a little room to move the second around behind it.
 The first thing I wanted was to add some stars to the top of the photo. I created a new layer and used the noise filter to create points of light, far to many on a standard filter so I used a Levels adjustment layer to drag the black slider up till there were a lot fewer points of light.
I then added a mask and erased the parts around the clouds and the lower half of the frame. The layer was blended using Screen to take out anything black, leaving just the points of light.
Next I added the sunrise photo, adjusted the position and added a gradient mask to filter out some of the top to allow the stars to shine through. This layer was set to Overlay/100% opacity with a Levels adjustment added to darken the whole thing up.
Once this was completed I posted it first class mail back to Lightroom to add the finishing touches.
Clarity and sharpening were added along with a shadow adjustment brush to bring out the main cloud a little.
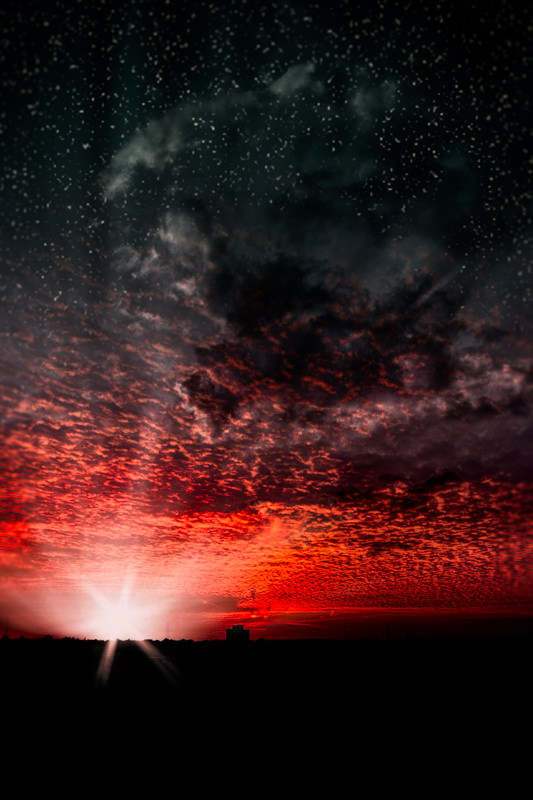
OK it is not that little and neither is the subject that was being lit by it.
I was bouncing around a parts and bits shop and noticed a cheap LED wand. What the hell I thought, its cheap it takes cheap ass batteries as well so I snapped it up.
Not having a proper studio studio set up I turned to the next best thing. The floor. I set up a red towel against the back of a chair and placed my 70-200mm Sigma zoom lens as a test subject.
The wand has two functions, a single front beam and with a flick of the switch a triple row of 28 LEDs flare into being. I used the main beam to try to illuminate the whole of the lens body. An exposure time of 4 seconds at 100ISO allowed me time to move the beam from the base to top easily.
I wanted to try something else. I flipped on the 28 lights and used the four seconds to light all around the front of the lens. This looked good but would cause shadows all around the back of the lens. So why not try all around?
Four seconds was enough for me to light the front of the lens then spin the light behind the subject resulting in clean light at the front and bright lines behind.

I like the first attempt although I would have liked the lights lower so I will be try this again soon. Seeing as the lights are ass bucket cheap I may buy a couple more for a cheap lighting set up.leaving me free to swing the original light around as much as I want.
LITF
Looking back at a few photos from last year I selected one to use with an effect given on this months Digital Photo magazine. It allows the use of displacement maps, added to the mirror image of shot to create the illusion of a rippled water.
I hunted though my back catalog of shots and found a shot from Windsor castle. Specifically one I took from the deck of a wobbling boat drifting towards the castle after a short trip along the river. I remember taking this shot through a plexiglass screen mounted on the front of the boat.

I desaturated most of the colours except the green in the original shot. Adding clarity and sharpness to bring out the detail in the stone walls and adding a vignette, I left this shot as was, until today. To sum up the method you use to create a mirror effect, you make a copy of the main picture, increase the canvas by 100% below the main image, flip the copy below the main layer, add 90 degree motion blur, then add a displacement map provided by Digital Photo magazine. For full details check out issue 180, Spring 2014.

I didn’t like the effect at first as it had a very sharp edge. I stretched the top layer down a little to add extra pixels. I then used a mask layer to take out the sharp edge and allow some of the trees and bushes to penetrate down to the lower layer. This gives a more natural look to the edge. I was going to stop here but I have never liked the square format of photos, always preferring the wide screen or 16:9 ratio.

Spinning around like a loon I threw the file into Photoshop and expanded the canvas to a 16:9 ratio. I then created two copies of the original and used masks to merge the left and right to expand the castle. The shot above does not so justice to the time spent on zooming in to the image to make fine detail adjustments. As you can imagine there were a lot of copies of stone work and cloud detail all these had to be removed as well.
Smacking me in the face was the SLR Lounge Texture file, 05-slrlounge-blends-paper-textures-0013.jpg. Not used to common assault by a jpeg file I allowed it to merge with the resulting file.

The colour, tone and texture added what I felt was missing from the overall result.
LITF

St John the Divine is a church sitting close to the former location of Merton Place, the country house of Admiral Lord Nelson and was built in 1913/14 to mark the centenary of his death at the Battle of Waterloo.
I had sent an email, introducing myself earlier in the week to the Revd Paul Hambling who agreed I could visit and take shots. Of course I offered the shots for the use of the website as a way of thanks.
I had previously taken shots at Winchester Cathedral, trying not to fall down the tight spiral staircase at the time, and completed some video work at Greensted in Essex. This time I would be different as I found out that I would be on my own in the church, not having to wait for other visitors to move along. I met Paul at the vicarage and he took me around to the church, giving me a brief tour and in case of emergency, how to open each door. I was allowed to move things as long as I put them back in the exact place I found them. The bell tower was out of bounds as it was being renovated and for health and safety reasons was closed for the time being. Paul left me with the key to the side door and I was alone in the house of God.
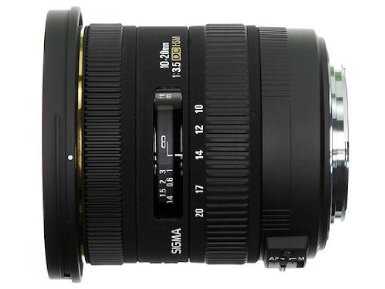
First thing I noticed was how quiet the church was. I expected things to creak with the wind outside battering the grill on the window, but no, total silence. This gave me time to think about what I wanted to do. I had three lenses with me, Sigma 10-20mm f/3.5, Sigma 70-200mm f/2.8 and the Canon 50mm f/1.8. I decided to do panoramic and architecture shots first with the 10-20mm, then close up work with the 50mm and finally anything else I can do with the 70-200mm.
You will know I have been getting in to H.D.R photography and thought this would be a great opportunity to experiment with the church interior.
I have found an annoying problem with my 10-22mm, because it is an extreme wide angle lens, not quite fish-eye, I have found I need to be dead centre when you have a lot of parallel and converging lines in the shot other wise it will look a bit weird. Lightroom can do a very good job of compensating for this but can produce distorted results. I am mindful that the Lightroom process can crop the image somewhat when compensating so I always take a step back or two to help in post processing.
However I started to move around the church taking multiple H.D.R shots. I tried just -2,0,+2 bracketing for the majority of them but in cases where there were windows I went along the full exposure range of -7,-6,-5,-4,-3,-2,-1,0,+1,+2,+3,+4,+5,+6,+7. This produced over 300 shots alone! Although I was allowed to move things around I am not much of an interior decorator so I only moved a book or two and the odd chair when needed.
I then switched to the 50mm and looked around for some close up work. I noticed there was a book open with passages about Lent. I focused on a passage near to the top of the book and took care to show the baptism font in the background.

I spent over two hours in the church, the light was fading as I left, locked the door and posted the key through the door of the vicarage. As I walked back along the gravel path towards the noise of main road, I stopped to take a last shot of the outside of the church.
LITF
 Following on from my walk around Canary Wharf, I arrived home and set about editing the shots.
One shot stood out from the rest. You might think this was a pretty bland shot. It is… and I thought that too until I started to play around with it.
In any apocalyptic film be it zombie, plague, alien invasion or general stupidity with nuclear space hoppers, you will almost always see a shot like this. Everybody is dead or dying and it is all over. No point worrying if you left the gas on at home. Your home is most probably gone by now so get over it.
 I first wanted to tone down the happiness of the first shot. For an apocalyptic scene this was far to ‘afternoon tea’ for me.
I pulled down the exposure but a lot but added to the highlights and sharpened slightly as I wanted the windows and the edges of the buildings to remain intact.
As it is still winter the trees looked dead anyway so they added to the scene of death and destruction quite well.
 I added one of the texture files from the SLR Lounge Texture pack to add haze and grittiness to the scene.
It could be fall out or flakes of skin from the rotting flesh of zombies, you decide.
It was starting to take shape now but I thought it was missing something. What is a horror shot without something to add a bit of blood to it?
 So that is what I did. I added a layer of red over the top, blended the layer as just Colour and reduced the opacity to 55%.
So what else was needed? What else could happen after a cataclysm? It would rain…
Of course it would rain! There is nothing like beating back a hoard of zombies with an umbrella.
 Rendering a new layer of fibers, setting the blend mode to Screen and reducing the opacity to 33% gave me rain that was heading straight down. Adding a final motion blur filter created the slant I was looking for. Rain straight into the eyes.
 I needed a bit of foreground interest in the shot to distract from the decay. I needed a positive.
If you find yourself being dragged to the floor and screaming while your leg it bitten off by a pack of rabid zombies then please relax and take comfort that in a world that is tearing itself apart, at least the municipal power company is still making a profit. If you ever do make it home alive you will probably find the bill on your door mat.
The lights were added by creating a standard lens flare and mirroring and flipping it three times to create the flood light lamps. This was then copied twice and reduced for the distance the other lights were situated.

The final composition per effect added.
LITF
In a stark contrast to the last post, where I was surrounded by tourists, my next jaunt into London saw me travel on the toy train called the Docklands Light Railway.
 Trundling along for a few stops from Bank station I got off at Canary Wharf. This has a high vaulted ceiling and was the first shot I wanted to take. I had been here before after dangling 90 feet up in the air on the Emirates Air Line a couple of years ago.
My new Sigma 10-20mm lens really helped for this shot. It allowed me to see more of the ceiling that my Canon 18-55.
Exiting the station and heading south I noticed something about the area. The lack of people. I would assume during normal working hours that I would be surrounded by people in suits but for now I had the place to myself.
 Rounding a corner I came across a wide open area. There were seats dotted around the place and a bronze statue of a centaur.
This is the work of Polish artist Igor Mitoraj. He wasn’t around to pose with the statue so I took a few shots. I thought they were a bit dull so I crouched down, set focus on the centaurs bald head and composed the shot so his hoof was close to the lens so I had foreground and background interest in the shot.
In post production I added a texture over the statue and blurred out the background a little to make him stand out a bit more. I also reduced the bronze colour and added a more subtle blue tone to the over all image rather that the grey of the surrounding buildings.
Leaving the prancing man-pony behind me I wandered towards the waters edge to the east. I bounced down a flight of steps, walked around a sleeping gentleman, ignoring the protests of my brain begging me to take a photo of him and wandered around the quay edge.
It was at this time I wish I had bought my Sigma 70-200mm zoom. I noticed a number of shots that I could have taken and sadly now missed. This regret was dashed when I found a row of Boris Bikes parked up along the quay edge. They looked out of place as I would have thought you would need a Boris Bike to get to this remote area to get one. Still it was one of those moments when I imaged how a shot would work but just by happenstance I was in the exact spot to take it.

Boris Bikes – Canary Wharf
In post I desaturated the colours so only the white, turquoise and blue of the bikes were dominant. Added some sharpening to make the whole shot sharp rather than just the foreground.
Resisting the urge to use a Boris Bike to bunny hope over a sleeping person further behind me I continued along and around Canary Wharf taking a number of interesting shots.
Check out this link for the full set: Canary Wharf
LITF
I had time to try out my new Sigma 10-20mm f3.5 today. I made the choice of wanting to photograph three iconic land marks on London.
I arrived at London Bridge Station and followed the sign towards HMS Belfast which is moored a short walk from the Shard. I was passing a large number of dead people… the London Dungeon was either close by or the cast of the Walking Dead were in town.
Side stepping a corpse who wanted to give me a leaflet, possibly titled ‘You are all going to die any way so please offer up your jugular’ I headed down towards the River Thames. Turning right I could see the HMS Belfast in the distance. I reached for my Canon, fitted with the 10-20mm Sigma wide angle lens nicknamed ‘Stubby’ and looked through the view finder.
The Belfast looked further away. OK then, turning from people drinking coffee I continued along the river bank to get a closer look.

Continuing past the Belfast’s 613 feet and 6 inches (thanks Wiki) I pushed my way through many tourists all heading in different directions. I headed towards City Hall. It looks like an onion that has been cut sideways and was about to fall over. Apparently it’s other nickname is the ‘Glass Gonad’.
Close by is a sunken amphitheatre called The Scoop. This looked like an excellent place for a photo… as soon as I reached for the camera… people appeared.. from out of nowhere the place was deserted one minute and crowded the next. So I sat down and waited. One thing about tourists… they always leave at some point.
After shouting ‘The tour bus is leaving in two minutes’ the Scoop cleared so I managed to get this shot.


Watching as some tourist were returning from finding the tour bus was parked up and the driver enjoying a bacon sandwich, I headed east again towards Tower Bridge, I headed under the bridge and across to a street called Shad Thames although I prefer the 1633 street name of Horseey Down. Perhaps the bloody cobbles made the horses fall over all the time. It might have been Horseleydown Brewery. As it was originally a large field for grazing horses and cattle, it is likely to be a corruption of ‘Horse Down’. (again thanks Wiki)
This is a famous street and has been used in many films and television productions. Oliver! in 1968, A Fish called Wanda in 1988 and now my blog in 2014.
Returning at last to London Bridge I found it stuffed full of tourists again. I waited, watching as people were taking photos with every device under the sun, phones, ipads, sketching, stone tablets. Some where even using memory…
I walked towards the centre of the bridge, and stood right where the two suspended roads meet. I have wanted to do a panoramic photo from here for a long time. Wish I had picked another, less crowded day to do this, I had forgot to bring my camera strap and had visions of my camera and Stubby tumbling into the river. No doubt someone would have filmed it.
I managed to take the shots I wanted with out loosing the camera and headed for home. Once at home I made some tea and sat down to edit the shots. The first I edited was of the panorama from London Bridge adding texture files and a subtle lens flare from the right.

LITF
 I was thinking about this for a while.
The makers of JPEGMini released JPGEMini Pro late last year. At £99 pounds it was a bit expensive but this afternoon I thought, what the hell I will make a purchase.
My original review of JPEGMini is here.
To summarize, JPEGMini rips the crap out of your photos so the file size is smaller but the resolution is the same.
JPEGMini Pro unlocks the following:
Once purchased and installed I tried running the main program on my photos that were over 28 mega pixels. This saved me another 60meg of data I will never have to see again.
I blinked and missed the actually munching process. So I tried it again while watching my CPU processor percentage of use and saw it was hitting 80-90% usage.
The Lightroom plug-in is where my interest was most concerned about. I had an email from tech support that I could include the plug-in within my exporting workflow. I also use another plug-in to automatically add a border and text to a picture and I was worried JPEGMini Pro would disrupt that.
Nope everything is fine in the world!
The plug-in sits at the end of an export process. Every this is done first and as long as the JPEGMini is last in line then it grabs the result and smashes it down to size.

This is my export for creating a full sized jpeg file from a photo. The jpeg is saved at 100% (Quality) compression, no resizing and JPEGMini takes care of the rest.
I can even use this if I want to Email direct to an mailbox from within Lightroom. I simply have to add JPEGMini to the end of the Email process and I have less chance of hitting the receiving mailbox file limit (some still do.)
As a speed comparison JPEGMini converted 30 identical images of my desktop in 18 seconds (Overwriting the same file on the Solid State Drive) while an identical folder was converted by JPEGMini Pro in just under 5 seconds.
Impressive… so I best go out and take more photos now.
LITF
 It’s February already? Wow. Ok better do another blog post.
Regular readers and voyeurs of my Flickr site will notice I have started to play around with H.D.R processing and cannot seem to get enough of it.
To this end I have bought a new lens to help me the Sigma 10-20mm f3.5 EX DC HSM.
Looking at Sigma’s acronyms I find that:
My Canon 18-55mm lens, on a crop sensor means its actual focal length is 28.8-88mm. This lens is 10-20mm so the actual focal length I get to play with is 16-32mm. It makes a massive difference to panoramas shots. I only need 2-3 shots where the Canon would need 5-6.
It has a constant max aperture of f3.5. so this is a fast lens. Auto and Manual focus modes but AHHHHH no Optical Stabilisation… seriously I had to grow up and not worry about OS/IS and get on with taking pictures.
As long as my shutter speed is above 1/20 then I should be OK.
So this afternoon I trudged up to Morden Hall park once again, slid around on the mud and tried to take some decent shots with my new lens. The first thing I notice was I was much closer to the trees I was with this lens. Reflexively I would stand back a good distance with the Canon but not so with this new lens, nesting birds can see the top of my head now.
There is just so much more you can fit in the frame with this lens. I found myself walking forward a lot of times as I had misjudged the distance. It is not a good lens for taking photos of ducks… they can see you coming a mile off.
I don’t speak Duck but I am sure one of them quacked at me ‘You need a zoom lens mate, try a Sigma’…
Once the ducks had walked off laughing to themselves, leaving me to ponder Lens Manufacturer knowledge of common or garden avian bird… I took this shot of a nearby bridge, no sarcastic ducks in site.
You can see the rest of the images at http://www.flickr.com/photos/focusffs/ and I hope to make a lot of use of this lens in the coming months!
LITF

